
How To Do Nail Designs With Tape
Love all that beautiful nail art you see celebrities wearing but can’t seem to afford a trip to the nail salon? Don’t worry because I’m about to give you some tips and tricks to achieving great nail art using what you already have at home.
You don’t need to be a genius to have your nails looking catchy. I promise, you can use tape and create some pretty fabulous nail designs at home.
Grab a drink and let’s learn about tri color cliff nails, galaxy nail art, creating stripes, splatter nails and chevron designs you can create at the kitchen table. Just follow these steps below and watch the tutorials on how to do nail designs with tape.
1. Splatter nails
This is the simplest nail art you can do at home. It makes a mess, but cleans up easily. To achieve this look, you’ll need tape, a small paintbrush, a white nail polish and 3 different colors of nail polish. I like to use tape to cover my fingers just above my nails to my knuckle. it makes removing splatter easier.
Start by applying the white nail polish on all your fingernails. Once done, take your small brush and dip into one of the three nail polishes and splatter on your nails. You will repeat the same process using the 2 remaining nail polishes. When you’re through, coat it with a top coat and use cotton wool dipped in a polish remover to get rid of the splatter around your fingernails.
Check out the splatter nail tutorial above for more tips for creating this nail design.
Tri color cliffs

This is another great design and does not require any tape. For this design, you’ll need 3 different colors of nail polish only. Start by applying a base coat on your nails. Then pick one of the polishes and with the polish brush, draw a vertical oval to the side of your nails. You are to start this midway or halfway on your nails ensuring that there is space between your polished nails and your cuticles. Proceed to apply the color to the center of the same nail but a little lower than the first one you applied. Then, create a third stripe that is lower than the second. When done, it should look like 3 steps. Repeat the same thing with the remaining 2 nail polishes and seal with a top coat.
The triple V Chevron Nail Design

This is another great nail art you can pull off using tape and everyone loves cute chevron nails. You also need 3 different colors of nail polish and tape. Start off by applying the first color of nail polish on your nails. Allow to dry. Then carefully place a piece of tape on your nails to create a V-shape space. Then paint the second nail polish on the space and remove the tape. Allow to dry. For the last nail polish, repeat the same process but target the ends of your cuticles before painting. Seal off your hard work with a top coat.
Stripes & Line nail art

Not only is this nail art very trendy but it happens to be rather easy to do. All you need is 2 different colors or nail polish and tape. Cut small pieces of tape you can use for form your lines and v shape and sit them aside. Paint your nails with one of the nail polishes and make sure it is dry. Now, you can place the tape on your nails in different directions to create stripes, thin or thick lines and your v. Have fun and play around. Once the t ape is on each finger, paint over the tape. When the last nail is done being painted, gently and swiftly remove the tape from each nail. Once done, apply a top coat and you’re done.
Galaxy nail art
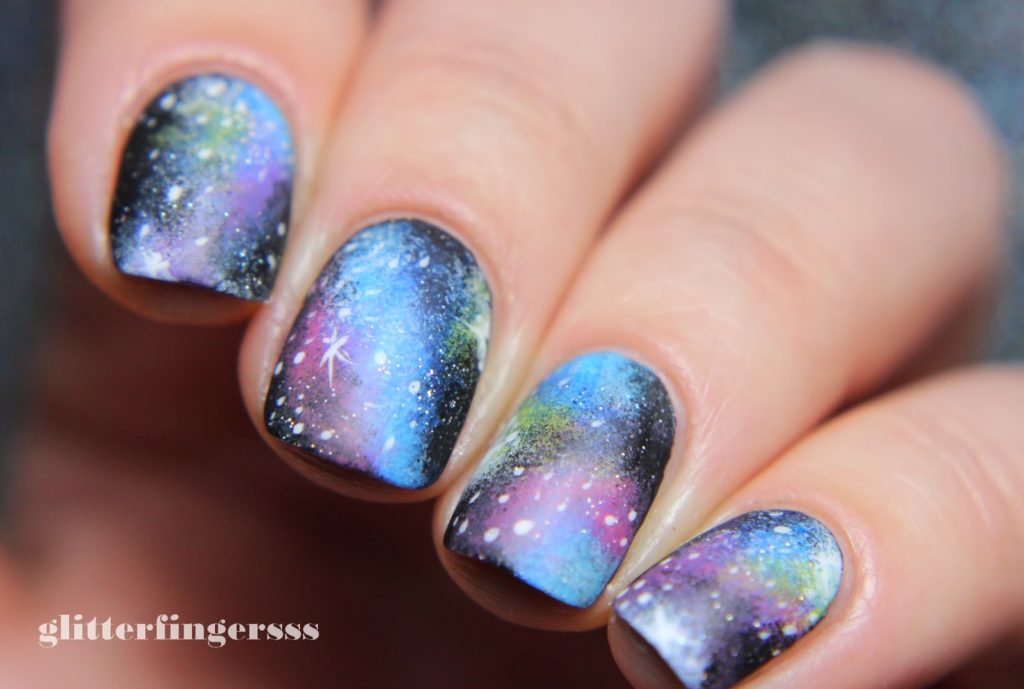
The effect of this nail art is so unique and attractive. What you need is a black, pink, metallic green, and blue nail polish. You also need a glitter top coat and a makeup sponge. Apply the black polish on your nails to serve as the base coat. Using the makeup sponge, dip it into the metallic green and dab onto your nails. Do the same with the pink and blue polish. At this point, your nails should have start looking like a galaxy. But to add more effect, finish off with a glitter top coat.
Check out this galaxy nail tutorial for more tips and other methods.
These 5 nail arts on how to do nail designs with tape will certainly set you apart from the pack and save some money too. Doing your nails at home allows you to spend more money on cruelty free makeup and have a girls spa day. 🙂 The best thing is that these nails can be done at home and on a budget.
Try any of them out and let me know how easy or challenging it was in the comment section.


I love that this is so beautiful and can be done at home! Cruelty free is also awesome